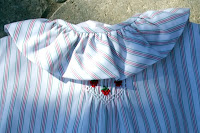
Wednesday, November 30, 2011

Festive issue has arrived!

Last week the Festive issue of A Needle Pulling Thread arrived in the mail. It is full of wonderful projects and vibrant colour photos of each. If you go to the web site you can see a preview of this issue and ordering information if you don't already have a subscription.  You can order single issues as well or if you look in your local book store you may find it there. Many fabric/quilting/needlework stores carry it as well.

There is a wonderful close-up of the Christmas balls on the web site in the preview. The graphs for each of the balls and directions for assembling each are included so you can have apparent seam-free decorations. Even the instructions for the ribbon trims have been included.


Also this week a wonderful couple of photos arrived from Kathy S. She made the little boy's suit from the pattern Infant Wardrobe I for a friend's grandson and monogrammed the breast pocket. What a lucky little guy and what a sweet child he is!!

It is so rewarding to see photos like these.


Another friend sent a photo of her grandson, Josh, wearing his Baby Boy's Smocked Bonnet. This actual bonnet is from the first version of the pattern. The current bonnet comes a bit lower over the ears. The bonnet would actually go together quite well with the suit for a cool-weather christening! Josh is now about three months old and growing so fast like all little boys!


I've been working on samples for the next semester's classes at Triangle Sewing Centre for Jan., Feb. and Mar. which will be posted to the web site as soon as possible.  One of the new classes is for a "Kobo Kote/Kindle Kase" which can easily be enlarged for an iPad pouch, a Sony Reader or other techno gadget cover. We won't let on but they actually employ a bit of smocking.  I've called it fabric manipulation as it doesn't involve conventional smocking. Have you figured it out yet?

So until next time do keep stitching........                               


Saturday, November 19, 2011

Other sites to visit!

We had our first dusting of snow yesterday morning and it was a shock to open the blinds to see all the white. Of course it was gone by lunch time as the temperature climbed and the sun rose. But it was a reminder of what is to come and that it is time to get ready - check out the windshield wiper fluid in the car and get the snow tires on the vehicles. One of these days we will have to deal with real snow but hopefully not for at least another month.

My friend Lisa Hawkes from New England has this wonderful web site, Pink Hollybush Designs. She began her business just over a year ago and it has been so exciting to watch her business grow. Lisa shops for her fabrics in New York City and takes care to only choose the finest quality goods. I just love her Mother-of-Pearl buttons as it is so hard to find them where I live. There is ivory Irish handkerchief linen and sumptuous silky pink silk dupioni - fabrics that are hard to find in Canada at this quality and price! You will find all sorts of interesting things when you visit Lisa's site.

Nancy Zieman is world famous for her TV program and mail order business which began back in 1979. But there is also a store, a retail location, Nancy's Notions, in Beaver Dam, WI where you can actually go and shop for all the things Nancy has made famous. They also hold classes!!

Last year before I started this blog I had a call from the store asking if they could order some of my Snowdrift patterns for a class. I was in shock to say the least to think that such a famous store wanted my patterns for a class. Well, once again I've had a call for more patterns as they had such great success last year, they are running the class again. 

Now it isn't being held until January 16 of next year but we should all be planning ahead, right?  So if you live within distance of Beaver Dam, WI, why not treat yourself to a class at this famous store?

Last summer I met a lovely lady in the manicure shop where we went to have out nails done for my daughter's wedding. While we were sitting under the nail dryer we got to talking, naturally. She told me about a group that she is involved with called Get Well Gang. These ladies knit or crochet hats for men, women and children undergoing cancer treatment. I've looked at their patterns, and having gone through chemo therapy, I can tell you the styling looks comfortable and stylish. If you have a desire to make a donation to this group or to make one of their hats for a friend who might be going through chemo therapy, believe me, there is a need. From my experience just keep in mind when choosing your yarn, it needs to be very soft to the touch and preferably hand washable. This is just one of their cloche hat patterns. You will make someone who is fighting this horrid disease so much more comfortable.

I hope you have found these web sites interesting and helpful.
So until next time, keep stitching.....


Sunday, November 6, 2011

That Sewing Place

This week I finally made it over to That Sewing Place on Bayview Ave., just one stop light south of Mulock in Newmarket! This new shop is owned and operated by Jaret Grimble and his sister, Liana Kirkey. I'm so sorry Liana was not in the day I was there to take these photos.

They have been open for a bit and are growing weekly! They carry Bernina and Brother machines and service all makes and brands. Now many of you will remember them from their mother's store, Evelyn's Sewing Centre. Well these two have struck out on their own since Evelyn retired to carry on the same high standard of service you were used to getting at their mom's shop.
Jaret & Evelyn coffee in hand!
Education is important to these two. You will be pleased to see the lineup of classes they have to offer and the number of notions grows and grows. If there is something you are looking for be sure to ask about it. They want to keep abreast of new things as well. And to my great surprise the prices were wonderful! So be sure to check them out whenever you can. I'm sure Evelyn will have the coffee on if she is in visiting!!


One of the things I was looking for the day I was in was a marker for dark fabrics. Liana showed me two. First was the Frixion marker. It comes with a nice fine point in many colours and can be removed with friction or heat. I immediately chose the lime green, one of my new favourite colours.....

Next was the Fons & Porter mechanical marking pencil which comes with additional leads. It comes in light or dark 'lead' and erases with white eraser. So you have a choice of two types and two price points depending on your needs.

We made one more trip to the cottage this week and although it was supposed to be nice all day, we drove into rain on the way up. It was quite cool and bleak with most of the leaves gone from the trees. I couldn't help but think of little suspended jewels though as we drove down the lane and saw the raindrops hanging from the bare branches. What do you think?
Winter is fast approaching and with it more indoor time for stitching It is definitely time to get your projects lined up for Christmas if you haven't already done so.

So until next time, keep stitching......


Monday, October 31, 2011

"Happy Hallowe'en!"

Tonight there will be so many little people out and about, going door to door with cries of "Trick or Treat!" Sometimes they are so small you wonder how far they will be able to walk! It is always so much fun to see them in their costumes and hear their shy, little voices. I wonder what characters will appear at our door....


 I always see loads of interesting Hallowe'en prints in the stores and never know what to do with them as I don't have any little ones at home to dress nor do I decorate the house any longer. But a friend sent a photo of her friend's grand daughter wearing the cutest little dress (smocked no less!) done in coordinating seasonal fabrics. The dress would be so easy to recreate but to top it off the little girl, Izzie, so just adorable.  

There is a "spot" of smocking in the CF with a little black cat. You could use the cat from the Hallowe'en Ball Leaflet, 'Cats & Bats' in the Atelier of my web site. I know it is a just little late for this year but the Hallowe'en fabrics will all be on sale now and you could start planning something for next year!!

While the east coast of the United States and Canada were being deluged with a surprise snow storm Saturday, here in southern Ontario we were blessed with beautiful sunshine. It was a bit nippy I will admit, but on our way to Oshawa for a dinner party, we spotted many a diehard golfer out catching what might be one of the last games of their season! 

Here is a sample of the colours still on the trees (on Sat.) in our backyard. We hold our breath as one day of good strong wind and these trees will be bare. We just hope that those who got all that snow and lost power will soon have it restored and have their lives back to normal.

So here is hoping you have a safe and happy night tonight! 
Till next time, keep stitching.....

Sunday, October 23, 2011

Creativfestival!

Fri. it was my priveledge to spend the day demonstrating in the booth for 'A Needle Pulling Thread' magazine. So many wonderful ladies who stitched for their little ones and those who want to stitch for their grandchildren stopped by the booth to share their experiences and dreams. It certainly gives one a lift and loads of inspiration.
 Here is Karen chatting with a couple of customers.
And here are two of the needle artists whose work has been featured. The lady with the dark hair, way over on the left hand side, is Carla, the heart and soul of the magazine! The pieces hanging on the back curtains are wither in the upcoming issue or the most recent one. Watch for the Festive issue which contains smocked Christmas balls to be released in the next couple of weeks.....
The Embroiderers' Association of Canada had a huge booth filled with the most intricate work! So many talented women!!
And here is my friend Lorna Rae of 'Blue Heron Stitchery' with just a few of the garments she made for the fashion show for the 'Sewing Workshop' pattern company. Lorna is a Custom Clothier out in Harrowsmith, ON just north of Kingston. She does incredible work.

The show was filled with wonderful booths and lots of people shopping their hearts out. I met up with a number of old friends that I had not seen in a couple of years and it was so good to hear what they all about what they were doing. 

Next spring the show will be back but out at the International Centre where there is loads of free parking! Mark the dates, April 27 & 28 now so you can join us there.

I thought that none of my photos of the mist on the lake at sunrise Thanksgiving weekend had turned out. But lo and behold when they were downloaded, look what was there!
The lake was like glass - not a ripple on it and as the sun rose the colours became more brilliant. One day I will take up my paint brush once again and try to capture some of this beauty on canvas.


So until next time, keep stitching......


Monday, October 17, 2011

Fall has arrived!

What a splendid Thanksgiving weekend we had here in Ontario! The temperatures were in the high 70's up at the cottage and we were stripped down to short sleeves for the outdoor work - chopping and stacking wood for the winter. 

The noontime turkey dinner all went well and instead of having a big meal in the evening we had a wonderful selection of cheeses, crackers and fresh fruits. The sunsets were glorious and the cool temperatures overnight lent themselves to a fairy-like mist over the lake in the early mornings. The camera or perhaps the camera person just didn't get the right settings to capture it all adequately.

So taking advantage of the beautiful weather the following week I chose to photograph the next set of adaptions to the Infant Wardrobe outside on the stone walk. I'd like to say it was 'dappled' sunlight not just shade which sounds so ordinary. 


It was the strawberry pin wale pique that inspired this set. The kilt and pants are from good "bottom weight" broadcloth. I used strips of bias cut pique to make the ruffles around the pockets and at the ankle to give them a playful look.

Then I added the same ruffles to the outer edge of the collar of the plain English Broadcloth shirt. The button placket was accented by a row of multiple zigzag stitching done with a triple needle threaded with red, green and red normal sewing thread. It tends to look like rick rack and is so easy to do!
Details make the difference and at the top of the back pleat I embroidered a little strawberry to act as the 'stay'. The collar, button placket and cuffs were edge stitched with red for additional colour.
Here is the back of the striped shirt. A bias-cut ruffle was used for the collar here and spot smocking added in the centre back and on either shoulder of the shirt front. Little strawberries were smocked and then a white border added. I cut the sleeves straight rather than tapered, lengthened them about 2" to allow for a ruffle and hem. Then they were smocked with two rows of simple two stem wave in white. I added little strawberries like the one on the plain shirt just above the smocking for another accent.

The shirts are interchangeable with the pants, kilt and jacket. Next job is to get these and more photos posted to the pattern on the web site.
 
I hope these photos will inspire you. I like to think of this pattern as the starting point for creativity. I'd love to see what you can do with this pattern!!

So until next time, keep stitching.....

Monday, September 26, 2011

Another version of Infant Wardrobe I

My friend returned for Calgary with a couple of photos of her grandson in his new black denim suit. She created the Infant Wardrobe I in black denim and worked a few designs from Native art in brilliant colours of Pearle cotton on the back and pockets. She envisioned this little guy wearing the suit with a red cowboy hat and red cowboy boots but his parents nixed the idea completely. Parents can be such a bore and unimaginative!
So here is little Nathan with his Thunder Bird Jacket and matching pants.Unfortunately the colours in the photo just don't do the embroidery justice. The red,orange and green were rainbow true and they looked more like magenta and lime. His T-shirt in the second photo is better but not the electric orange he was wearing. Apparently he insisted on wearing his new suit to daycare the next day so I guess it was a hit with him and that is all that really matters.

Nathan has a new baby brother and here he is wearing the Baby Boy's  Smocked Bonnet and an heirloom bib for which I can take no credit. What a cutie! Can't wait for him to grow a little bigger and for Grandma to make him a few more clothes for us to see!! I understand he is growing by leaps and bounds.


The fall issue of A Needle Pulling Thread is in bookstores now. There are so many beautiful projects in this issue, many of which would be good projects for Christmas gifts. But if there is nothing there this time, let me assure you that the Festive issue is soon going to press and it is packed with even more beautiful things. There will be smocked Christmas balls - a beginner, intermediate and advanced level designs - and many more projects for you to interpret as you like. 
So often we see something that is not in our favourite medium. If you cross stitch and you see a quilting pattern, who says you can not re graph the design and stitch it? The magazine is all about creativity. Nothing would make Carla happier than to see photos of how you created from the magazine.
So until next time, keep stitching......

Tuesday, September 13, 2011

Fall coming in fast

The other day a friend sent me a note about iron cleaning and I thought, yes, how timely. With everyone getting back to sewing and probably getting their sewing room back in order, we tend to clean up whatever creative messes we've developed over the summer. Our irons are such work horses and too often we neglect their care. Every iron has it's own set of rules about cleaning the water tanks but cleaning the face is not at all hard and only takes a minute.

If we let our iron develop a build-up of craft glue or adhesive from iron-on products or just plain old spray starch these gunky gooey things can transfer to our clean, new fabrics and make a real mess! There are a number of products on the market with which you heat the iron to cotton or higher and simply wipe the face with a cloth loaded with cleaner. Be sure to clean the sides of the face and the holes of the steam vents. When the iron is cool it is a good idea to wipe it again with a damp cloth to be sure there is no residue from the cleaner.
 

I have used a cleaner from Dritz for years and there is an excellent one on the market from Rowenta in kit form that even includes the cleaning cloths!

Another area that needs attention is our iron board covers. They get just as dirty and I have cut up some white cotton sheets (we don't have twin beds for the kids any longer) to pin firmly over my ironing board cover. When scorch marks or any spots start to show, it is just a snap to whip one off and replace it with a fresh clean one. I want to experiment with making lavender water to spritz on my ironing board so everything smells wonderful - anything to make ironing and pressing more enjoyable!

One of the ladies who attended the Workshop last summer out in Westport, ON sent me a photo of her finished gown. 
Yea, Judi!! Well done! It is so great to hear back from students when they finish a project, no matter how long it takes.

We did a lot of technique on the sleeves of technique on the sleeves of my pattern, "Autumn Leaves" in this class. The pattern front shows an heirloom view in pink and we elaborated on that view.


Another lady sent a photo of her granddaughter wearing the "Little Breeze" pattern which she had made in a class this spring. It would make such a cute jumper for fall in a very fine corduroy, teamed with a little coordinating turtleneck T-shirt, don't you think?

I absolutely love the fabric she has chosen for this gown and I understand the dolly's version may be in the works. Let's hope so, so we can see them together.

Smocking on a print is not always easy but she has chosen her colours well and the stitching is not lost in the print. Note that she has also outlined the armhole bands with pink rickrack. Great touch!


Well, I just have to share with you, once again, a couple of photos of the sunset from up at the lake. This year we have been blessed with such spectacular mornings and evening - the weather has not always been spectacular to match though. The season is drawing to an end so I hope these haven't been boring for you. (And by the way I haven't altered the colours. I found a sunset setting on my camera that captures those fantastic colours.)
Going

Going

Gone
 
So until next time keep stitching.....

Monday, August 29, 2011

Casting on with Jean Greenhowe....

This past week one of my friends dropped in to get some help with her sewing machine. She brought with her some of her work and I just had to share these photos with you!

Lynn is becoming renowned for her needlework in yarn. The number of first prize ribbons for her knitting and crocheting keeps growing year after year and she is now becoming a judge for the local fair.

Here are some photos of the little Jean Greenhowe dolls that she makes. She sent me these details on the dolls along with their pictures. They are all made with double knitting yarn; the scarecrow figures are about 13” tall and the other dolls are about 15 to 17” tall.  "They are what I call a “soft toy” as there are no wires or buttons involved.  Perfect for a hug or just tucking under a chubby little arm."


I can't tell you how sweet and charming they are. She said each doll takes about a week to make and when you see the detail it is no wonder. All the parts are stitched down so you can not lose a hat or pantaloons. I know how to knit so I can appreciate the quality of each of these little people. I am thinking that perhaps I should purchase a couple in anticipation of a grandchild in the next few years....  

If you are interested in contacting Lynn, let me know and I will put you in touch with her. I am sure she would ship them to anyone who was interested and they are light as a feather so it wouldn't be that expensive to do so. 

So until next time, keep stitching!!

Monday, August 22, 2011

This 'N That...

It has suddenly turned fall-like! The blue jays and crows are heard calling most days and I spied a small flock of geese passing overhead early one morning in formation! Practicing no doubt for that long flight south. The mornings are decidedly cooler but the days are still wonderfully warm thank goodness. And of course the CNE (Canadian National Exhibition) has opened. Every year it signals the end of summer and when it ends on Labour Day, school begins the following day.

We were driving to Orillia the other weekend and I convinced my husband to stop so I could photograph these signs at this little shop along the way.


They have coffee, deli meats, the biggest and best stuffed olives (blue cheese or jalapeno pepper to mention two kinds), desserts to die for, old fashioned candies and lots of really interesting 'stuff'. But what I love the most is the parking sign:

I'm thinking of getting one of these made up for our cottage parking lot!!

There was the most unusual sunrise the other morning at the lake. We face the west and to see the sky all pink and reflected on the water was amazing. Contrary to the old farmers' saying, "Red sky in the morning, sailers' warning" it didn't rain.
Equally beautiful and amazing was one of the sunsets that weekend. the tree branches just wouldn't get out of the way and the sun kept moving so this was the best I could get. It reminded me so the the "eye" in the movie series, Lord of the Rings. There was an eye-like slit in the cloud cover through which a brilliant circle of white light was emitting its rays and these in turn were reflected on the water. It lasted only a very few minutes and was gone and dark!

Erika and I have been working hard over the past couple of weeks. She showed me how to create smocking graphs using Adobe Illustrator and so I have been practising. And now the new fall schedules have been updated and will be posted as soon as possible. 

I am anxious to get a few more things out of the way and get on with some new work. 

So until next time, keep stitching......

Thursday, August 4, 2011

Setting in sleeves

Although the new pattern, Infant Wardrobe I, says you can use light weight denim, Patricia ran into a problem when making the jacket for her two year old grandson. This little guy lives out in Calgary, home of the world famous Calgary Stampede. Patricia envisioned the boy's view made up in sporty black denim with brilliant colours of native embroidery and set off with a T shirt, cowboy hat and boots. All went well until she went to set in the sleeves.

All patterns have limitations and a designer can not predict how every fabric will react. I want you to think beyond the Christening outfit and be creative. Don't be afraid to be challenged. There is always a solution.

The denim plus the lining proved rather bulky and the results were more like a puff sleeve which might have been fine for a little girl but not the tailored look she had planned.

So she brought it to me and asked what do I do now? The jacket was finished - buttons, buttonholes and embroidery all in tact - she didn't want to ruin it after all that work.

It was obvious to us both that there was simply too much fabric at this combined weight of denim and lining to allow the sleeve to fit smoothly into the armhole - so - a trim was needed! 

By shaving three eighths of an inch from the cap and tapering it to nothing at the notches the amount of fabric would be reduced significantly and the angle of the sleeve in the garment only slightly altered. The notches were transferred to the new cutting line. The gathering threads would have been put in place again at one quarter inch and one half inch but I was not going to remove the whole sleeve from the jacket! If you were starting fresh that would be imperative but I knew that a technique from tailoring would work well in this case.
With this technique, you divide an area in half and pin. Then divide that area in half and pin. You keep doing this until you have no more room to place a pin or the fullness is used up. On the left you can see how the notch and the shoulder seam have been matched up and the area to the left has begun to be divided and pinned. On the right you can see my hands dividing the area to pin. Or you can fold the fabric in half, lining up the last two pins to find the centre of the sleeve and armhole. This is more accurate in the beginning when you are working with a large area.  As you get down to less fullness you can see how much fullness you have to divide and pin.

Here you see the sleeve pinned in place. There is no more room for any more pins because of the bulkiness of the fabric. Next I hand basted the sleeve in place. Yes, hand basted! with a back stitch to get the most control. Back stitched because I had to use  stitch that I could 'pick and poke' to get the gathers eased out. Had I gone to the trouble of putting in the gathering threads once again, I could have pulled them up and eased the fullness further. But I didn't, so hand basting was imperative! And I might say it worked perfectly.


So here you can see the finished seam and how I am easing in the fullness of the raw edge as I overcast with a zigzag stitch. I used a trolley needle to hold the gathered down and in place as the fabric passed under the machine foot. When the seam allowance is pressed into the sleeve it acts as a support for the sleeve cap and helps it to sit properly.

Oh, but you are not finished yet! Setting the finished sleeve with a bath of steam is important. Steam works best as you won't have any shine from the iron. If you don't have a tiny sized pressing ham or the sleeve won't fit over the end of you sleeve board, create a ball-shaped support from a towel or a couple of washcloths. This needs to be pretty firm though so it may take a bit of 'finaggling' to get something to fit into the sleeve cap area. If the jacket had been made of wool the sleeve could be set with steam alone and all fullness worked out. But with cotton denim (which stretches!) a good bath of steam with the support to shape it all will work well. Remember that it is a child's garment and will be washed often so don't over stress yourself! I just have a tendency to want perfection. 

So here you can see the finished product. I think you will agree it looks much better and Patricia was happy with the results. 

Every fabric is a learning experience and I can hardly wait to see the photos of this little guy all decked out in his Western version of the Infant Wardrobe. I will post photos as soon as she send them so watch here in the next couple of weeks.

Until next time then - you know the drill - keep stitching!!!!