Cleaning your Pleating Machine!
Bet this job rates right up there with cleaning your
sewing machine and/or serger. (And when was the last time you did that little
job?)
Never fear, cleaning your pleater takes only a few
minutes when you have everything organized.

You will need a clear space to work some Q Tips, a few
facial tissues, an old tooth brush, some sewing machine oil, the right kind of
screwdriver to fit all the screws in your pleater, and a sheet of waxed paper.
So let’s get started….
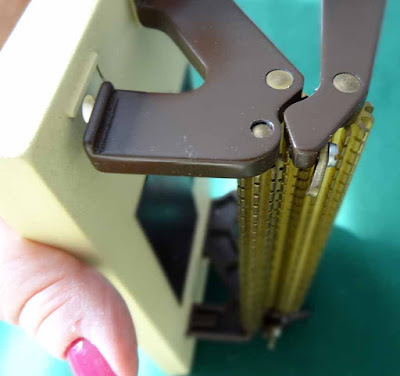
First you will need to loosen the screws that hold the toggles in place to secure the removable roller.
First you will need to loosen the screws that hold the toggles in place to secure the removable roller.
Don’t take the screws out just loosen them enough
to remove that roller. Some machines do not have a screw but a ‘pin’ that holds
the bar in place.


Lift or roll out this bar. And set aside. This is roller #1.

 Next remove all the needles. Line them up or ‘nest’ them
to check for any that are bent and discard those needles in a safe manner. Set
the remaining needles aside on a tissue.
Next remove all the needles. Line them up or ‘nest’ them
to check for any that are bent and discard those needles in a safe manner. Set
the remaining needles aside on a tissue.
Now turn the machine over to remove the feet which hold
the end bracket in place. You are going to remove the ’non-handle’ end
bracket. Unscrew the feet and set them
aside also. Grasp the bars as you turn the machine upright again.

Slide the bracket and bars apart and set the bracket to
the side. Now you can remove the two removable bars. Set them aside along with
bar #1. Note that with most machines the
length of the end pieces (the part that fits into the brackets) is longer on
the last two bars so it is harder to
mix these up. Set the bars so the double spaced needle holes are at the same end. If you have a machine that is double space all the way, try to keep the bars in the same order as they were in the machine.

Now you can start to reassemble the pleater.


mix these up. Set the bars so the double spaced needle holes are at the same end. If you have a machine that is double space all the way, try to keep the bars in the same order as they were in the machine.

To clean the ends of the bars, remove any threads that
have wound round them and moisten a Q Tip with oil. Wipe the ends with the Q
Tip and then with a tissue. There will probably bel lots of black from the
brass transfer to these two. Clean the non-removable bar in a similar manner. Brush
the rollers with the toothbrush to remove any lit or other bits.
 |
| See what kind of 'black' you can get and all the bits of thread |
Next clean the holes in the brackets where the rollers
sit. Swab them out with a Q Tip loaded with oil. These will probably blacken
the Q Tips as well.
Wipe the base and if necessary moisten a cloth and wipe
it down.
Now you can start to reassemble the pleater.

Tip the pleater up on the handle end to reposition roller
the three rollers starting with #3.

Replace the bracket by slipping the roller ends into
their holes. (This can be tricky but take your time.)
Grip the bracket to the base and tip wrong side up and
replace the feet. Tighten the screws that hold the feet in place.
Turn right side up. Check that all the double space needle holes all at the non-handle end and give the handle a twirl. It should move smoothly now that everything is clean and oiled.

Load the needles. Wiggle the handle slightly to settle
the needles in place then replace the last roller (the removable roller). Turn
the handle once more time then tighten the screws that hold the toggles in
place (or slip the pins in place). You might want to back off the screws a bit
from tight so the rollers turn freely.

Run a tissue through the pleater to absorb any excess oil
lest some soil your fabric.
Lastly run a piece of waxed paper through the pleater to
lubricate the needles. Be gentle removing it though lest you bend a needle.
And now your pleater is ready to get to work!!