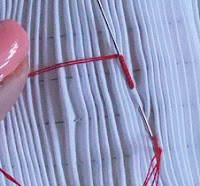
Bullion Knots are best worked with a lovely long milliners' needle sometimes called a Straw Needle. Both names refer back to the days of hat making when long needles were used and thin needles didn't break or punch big holes into or break straw hats forms .
In this type of needle the eye of the needle is the same size as the shaft allowing wraps to pass off the needle without getting stuck. Many of us smock with embroidery/crewel needles in which the eye is long, wider and flatter than the shaft to make it easier to thread. Unfortunately this wider eye make it very difficult to make any kind of knot that involves wrapping the needle.
The size if the needle will greatly influence the size of the knot. The finer the needle, the finer the knot will be. A #11 milliners' needle is great for a single strand of 'floss'. A #3 will work for a single strand of Pearle cotton. Fortunately milliners' needles come in a good range of sizes so you can match the needle to the fibre with which you are working.
The neatest knots are made with one or two strands of 'floss'. The needle should be slightly larger for two strands. Regardless of how many strands are used, they must not cross over one another on the needle but be wound in a smooth coil. Keep a pencil and piece of paper by your work to record the number of wraps you put on the needle so you can match a second knot to the same size as the one you have just created. If your floss begins to wear or look fuzzy, switch to a fresh piece.
Bullion knots can be created on flat fabric (skip the hoop if you use one) or on pleated fabric for smocking embellishments. In smocking they are easier to do on the crest of a pleat, running lengthwise but they can be done in any direction. Just be prepared to work through the pleats when traveling from point B to point A. For this reason they are usually left to the end after the smocking has been let out to full size - they have no stretch and will restrict the pleats.
 |
| Pleated fabric or flat - come up at Point A, take stitch from B to A |
Come to the surface at point A. Take a stitch from point B to point A but do not pass the needle all the way through the fabric. Leave it 'parked' in the fabric to wrap the needle.
With the floss that comes out of fabric at point A, wrap the needle travelling towards
the point of the needle. Gently slide the wraps on the needle towards the fabric without
disturbing their order. The number of wraps should be as long as the stitch.
You can add a couple of extra to be safe. You can take wraps off but you can not add them. Record the number of wraps.
 |
| On pleated fabric right handed |
 |
| On flat fabric left handed |
 |
| More wraps than length of stitch... |
Hold the wraps, the needle and the fabric in your hand and grasp the
needle between the finger and thumb of your other hand to pull the needle
through the fabric and the wraps. Do not let go.
Keep pulling until you cannot
pull any more. Now you can let go and gently pull the ‘core’ thread (the one that
has passed through the wraps) towards point B. If there are too many wraps and
the knot bulges too much, you can remove one wrap at a time by passing the
needle under the wraps. Gently tighten the ‘core’ thread each time you do this and
note the changes on your paper. “Groom” your knot and pass the needle to the
back at point B to finish your knot.
 |
| Hold to pass needle |
 |
| Pull until you can pull no further |
 |
| Gently pull into place and groom |
 |
| Take needle to back at Point B |
 |
| Come up at Point A, Take stitch from B to A |
 |
| Wrap as before |
To do a second knot, repeat the process by coming up at A, taking a
stitch from point B to point A. Usually one starts with one knot or a pair
of knots in a dark colour for the centre. The knots around the centre get paler and
larger with more curve as the flower builds outward.
Note: To make pairs, when you wrap clockwise the knot will want to curve in one direction. When you go to make its mate, wrap in the opposite direction.
Note: When you are making a long bullion knot you may wish to anchor it to prevent it slipping out of place. When the knot is completed, come up on the inside with the floss and take a stitch as you would when making a lazy daisy stitch. Stroke the knot to work the stitch into the wraps. It will become invisible and your knot will stay put!
Note: If you are left handed, you work the knot exactly the same way only reverse the hand positions.
 |
| Simple Bud - two bullions |
 | |
| Complex rose made up of several bullions |
 |
| Tulips in a smocking design - Bullions are horizontal |
There are so many configurations of knots and many excellent books out there. This is just to get you started.
So till next time, keep on stitching.....


I never put 2 and 2 together to realize that twisting the thread in the opposite direction would make the bullions curl differently. Most tute stop at: twist clockwise. Good tip.
ReplyDeleteuseful tutorial.Thank you.
ReplyDelete