You are ready to start pleating!!
Here are a few tips to get you going.
(Photos in this blog have been taken using the ComPleater Box available through
Amberlane)
Begin by removing all needles not required for pleating your fabric from the machine. This saves wear and tear on the needles not being used and could prevent breakage. It also allows you to check these needles for a bent one or other damage.
Needles for most projects are positioned at the ‘non-handle’ end so only the fabric being pleated passes through the machine. To thread, pull the thread up from under the needle. Pull through the eye of the needle sufficient thread to reach the table top. By allowing this amount of thread, you are far less likely to have the thread pull out of the needle(s) when clearing the fabric. Threading from the bottom up allows you to easily clear the thread from the needles when pleating is complete. But more about that later.

On the right is a side view of a Read 16 row pleater mounted on a ComPleater box, pleater tipped up for ease of pleating. The fabric is rolled onto a dowel and has started to pass through the machine.

Here you can see that the fabric was positioned to pass through the pleater rollers so the first gathering thread is one full space down from the raw edge of the fabric. This allows for a ½” seam allowance which will fall just below the first gathering thread. Passing the fabric at ½ space from the raw edge would allow you to use a smaller seam allowance.
The needles in this photo on the left are full and need clearing. When this happens, you will find the handle harder to move and the machine will sound like it is starting to ‘thump’. Do not force the handle any more. Stop and gently ease the fabric off the needles.

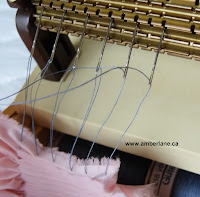
Here the pleating is done and the last of the fabric is cleared from the pleats. If you slightly raise the fabric you can slip a finger in between the threads in the needles. Keep in mind that the thread on the top of the needles is the short end (not attached to the thead spools) Gently pull up on each of these threads to remove them from the fabric. See the close-up below. You may wish to put a thumb nail on the needle to give some support while pulling the thread out – just to prevent bent needles.

Once the threads are released from the pleater, you can simply pull up and give yourself enough thread to accommodate the letting out of pleats for smocking. More will be needed for a bishop but once you have spread the pleats and tied off the threads, you can trim the unwanted ends. You will learn to gage how much thread you need but it is better to have more than insufficient.

With the Read pleater you will find that the pleating rolls so that the wrong side is the ‘inside’ of the roll. The long stitch is on the wrong side. When you pleat with a Read pleater place the fabric so that the wrong side of the fabric is ‘up’ or next to the roller. This allows you to see a seam more easily if you must pass one through the machine.

The fabric is positioned to hold 13 rows of gathering threads centered on the fabric. Leaving the extra two needles on the ends, ensures more even pleating. (I cheated for this and eft all the needles in place.) Below the fabric has been cleared from the needles. The pleating is evenly centered.


On the right you see the difference in the pleating from the Read to the Sally Stanley. The needles of the Sally Stanley are much closer to the center of the pleat and it is more difficult to identify the right and wrong sides. The long stitch is still the wrong side. Just note that fabric should be pleated with the right side facing up so the gathering threads are slightly to the back of the fabric.

Here is another type of insert done on a 24 row Read pleater. Sometimes you want to pleat a piece of fabric with the pleating centered in the middle of the fabric, leaving a ruffle on each end (e.g. for decorations).
Lightly press the fabric in half so you can line up the fabric to a needle or a half space while you are pleating. In this example six needles have been threaded up and the fold is lined up to a half-space needle as a guide.
Whatever you choose to pleat, a light shot of spray starch will give you better and crisper pleats. Keep your pleater clean and pass some waxed paper through occasionally to lubricate it. And most of all, check your needles often for bends or damage. Needles should be sharp; keep in mind they don't last forever.
I hope this is a help to those of you who might have questions about pleating for smocking.
So until next time, keep on stitching!!
 |
| 16 Row Read Pleater and ComPleater Box |
Begin by removing all needles not required for pleating your fabric from the machine. This saves wear and tear on the needles not being used and could prevent breakage. It also allows you to check these needles for a bent one or other damage.
Needles for most projects are positioned at the ‘non-handle’ end so only the fabric being pleated passes through the machine. To thread, pull the thread up from under the needle. Pull through the eye of the needle sufficient thread to reach the table top. By allowing this amount of thread, you are far less likely to have the thread pull out of the needle(s) when clearing the fabric. Threading from the bottom up allows you to easily clear the thread from the needles when pleating is complete. But more about that later.

On the right is a side view of a Read 16 row pleater mounted on a ComPleater box, pleater tipped up for ease of pleating. The fabric is rolled onto a dowel and has started to pass through the machine.
Here you can see that the fabric was positioned to pass through the pleater rollers so the first gathering thread is one full space down from the raw edge of the fabric. This allows for a ½” seam allowance which will fall just below the first gathering thread. Passing the fabric at ½ space from the raw edge would allow you to use a smaller seam allowance.
The needles in this photo on the left are full and need clearing. When this happens, you will find the handle harder to move and the machine will sound like it is starting to ‘thump’. Do not force the handle any more. Stop and gently ease the fabric off the needles.
Below you see that the fabric has been cleared from the needles so you can carry on pleating.
Here the pleating is done and the last of the fabric is cleared from the pleats. If you slightly raise the fabric you can slip a finger in between the threads in the needles. Keep in mind that the thread on the top of the needles is the short end (not attached to the thead spools) Gently pull up on each of these threads to remove them from the fabric. See the close-up below. You may wish to put a thumb nail on the needle to give some support while pulling the thread out – just to prevent bent needles.

Once the threads are released from the pleater, you can simply pull up and give yourself enough thread to accommodate the letting out of pleats for smocking. More will be needed for a bishop but once you have spread the pleats and tied off the threads, you can trim the unwanted ends. You will learn to gage how much thread you need but it is better to have more than insufficient.

With the Read pleater you will find that the pleating rolls so that the wrong side is the ‘inside’ of the roll. The long stitch is on the wrong side. When you pleat with a Read pleater place the fabric so that the wrong side of the fabric is ‘up’ or next to the roller. This allows you to see a seam more easily if you must pass one through the machine.
 |
| 24 row Sally Stanley pleater threaded to pleat an insert. |

The fabric is positioned to hold 13 rows of gathering threads centered on the fabric. Leaving the extra two needles on the ends, ensures more even pleating. (I cheated for this and eft all the needles in place.) Below the fabric has been cleared from the needles. The pleating is evenly centered.


On the right you see the difference in the pleating from the Read to the Sally Stanley. The needles of the Sally Stanley are much closer to the center of the pleat and it is more difficult to identify the right and wrong sides. The long stitch is still the wrong side. Just note that fabric should be pleated with the right side facing up so the gathering threads are slightly to the back of the fabric.

Here is another type of insert done on a 24 row Read pleater. Sometimes you want to pleat a piece of fabric with the pleating centered in the middle of the fabric, leaving a ruffle on each end (e.g. for decorations).
Lightly press the fabric in half so you can line up the fabric to a needle or a half space while you are pleating. In this example six needles have been threaded up and the fold is lined up to a half-space needle as a guide.
Whatever you choose to pleat, a light shot of spray starch will give you better and crisper pleats. Keep your pleater clean and pass some waxed paper through occasionally to lubricate it. And most of all, check your needles often for bends or damage. Needles should be sharp; keep in mind they don't last forever.
I hope this is a help to those of you who might have questions about pleating for smocking.
So until next time, keep on stitching!!


