Tuesday, October 30, 2012

Back again with a possible new pattern

I was shocked to see how long it has been since I posted at this blog. I'm back an hopefully will be able to devote more time to writing.

In Canada we celebrate Thanksgiving in October and our family gathers up at our cottage where usually the leaves are wonderful rich reds, oranges, gold and light yellow. This year didn't quite give us those brilliant reds.


On Thanksgiving Tues we left on a trip to Atlanta for the Smocking Arts Guild of America convention at the Peach Tree Plaza Hotel. It was an interesting drive as neither my husband nor I had been through Kentucky or driven through Tennessee! It took less time than we thought and so we arrived a day earlier than we had planned - what a bonus to have a day to prepare for all we wanted to do.

Meehan's Public House the Irish Pub where we ate one night.

So Wed. evening I took in a fashion show put on by "Peanut Butter 'n Jelly Kids" at the Meet & Greet followed by the Teacher's Meeting. On the Thursday evening they held the Show and Share along with the Design Show and the Teachers' Show Case. I brought a number of class samples for display for the Showcase and met so many great ladies from all over the country. We ran overtime and I really didn't get to see either of the other two displays. 
SAGA Kits for purchase in Hospitality
                                                              
Then on Friday afternoon through the evening the big event was the Market and we had a really busy booth. 
Bob introduced his new rod system for the pleating machines, the "Select-a-Size" and I showed the new infant girls' dress and diaper cover. Both got rave reviews and as soon as we can get these ready for sale they will be posted on the web site and here as well. 
Saturday morning found us back on the road again. We drove straight home and unpacked so Bob could do a quick turn around to drive to Edmundston, New Brunswick to check on his elderly mother. 

Bob got back Sunday just in time for hurricane Sandy. In fact he drove through torrential rains most of the way home and Sandy didn't even hit until last night, Monday. Where we are, an hour north of Toronto, after all the hype, the storm turned out to be a non-event (thank goodness). We had stocked up on extra drinking water, food, a spare tank of gas for the BBQ, batteries and all the things they told us we should have on hand for a lengthy time without power. All was normal when we woke this morning but south of us, in Toronto there was a fair bit of damage and power failures. Our son-in-law was in Manhattan on a work-related visit so he is going to have a few adventures to tell. We've be e-mailing back and forth and he is fine - a bit wet but surviving. Bet he can't wait to be home!


So after all the boxes were unpacked and everything put away, I got side tracked with a request that truly intrigued me. A lady from Utah had written before our Thanksgiving to ask if I could create a pattern for a baby boy's tuxedo jacket to go with the Infant Wardrobe I.  Here are the photos she sent to show me the type of tuxedo jacket she needed.
Now the Infant Wardrobe I pattern (in case you are not familiar with it) contains a pattern for a tailored boy's shirt, pants, bow tie and jacket along with a kilt, tam and girl's variation on the shirt and a wee jabot. She had figured out a vest and only needed the jacket. At first I dismissed the idea as too much work for a one time pattern but this lady convinced me to give it a 'go'. I did and here is the finished jacket.


So my question to you is would this be of interest for wedding, special occasions, baptisms, christenings or blessings? Should I grade the pattern to include all the sizes found in the Wardrobe or leave it? Right now it is only in Size 11 pounds.

Now it is back to finishing the little girls' dress pattern. One more test sample to create and then it is the writing and illustrations. The pattern pieces are now done, labelled and nearly ready to go to print. Keep an eye on this site as I will soon be posting photos.

So till next time, keep stitching.....


Wednesday, September 26, 2012

Mini Piping made easy

I've been busy working on preparations for the trip to Atlanta for the Smocking Art's National Convention. And I am hoping to have working samples ready to show for my next pattern.

One little detail I used on one of the samples is mini piping - and I do mean mini! The piping was applied to the gusset seams of the diaper cover and the edges of the circular yoke. Since this is a baby pattern the details had to be tiny. I chose to make this sample in blush pink Imperial batiste, a light-weight fabric.

The first thing you need to do is cut strips of bias fabric. I like to work with 1" to 1 1/4" depending on the size of the seam allowance to which the piping will be attached. To get nice even piping you need to have enough fabric for your machine to grip when stitching. You can always trim the seam allowance further if necessary.

So as far as supplies go, look for #10 crochet cotton as a filler. Here you see a "Mettler" brand cord that I picked up in a sewing machine store as it was a novelty - not something I had seen in common use. Crochet cotton is easily available inexpensive and very stable (won't shrink!). I prefer to use a 7 groove tucking foot for fine fabrics as you can feet the cord and fabric into the groove and get an even-sized piping without a lot of trouble. As a backup, I would use a Bernina #10, edge joining foot or similar foot with a centered blade to apply the piping. 


Making the bias is fairly simple. Fold the bias over the cord and fit it into the slot on the foot next to the needle. On my machine I move the needle one click to the left to get a week bit closer to the cord and thus a finer piping. You can stretch the bias a wee  bit if you like but the main thing is to stitch evenly and at a moderate speed.


Next is to apply the piping to a seam edge. Here you see the piping foot being used. With my machine foot you have to be careful to measure the finished seam allowance and adjust the position of the fabric to be sure your seam allowance is accurate. If this is case for your machine and tucking foot, try using that foot with the blade. Whichever foot you use,  guide the fabric up to the marking on the throat plate and hold the piping up slightly in your left hand so the groove grips the cord. The machine will do the rest. Just do not stretch the piping while applying it to your fabric or you will have puckered seams. There is no way short of unpicking the stitching to fix this so take care the first time around!

In my sample, I trimmed the seam allowance of the piping slightly to reduce bulk in the finished seam.


Next step is to complete the seam. With right sides together, sandwich the piping between the two layers of fabric. Lay the fabric beneath the machine foot with the stitching from applying the piping on top. Use this stitching as your guide to join the seams. 
Now, if you didn't stitch quite close enough to the cord when you attached the piping to the first side, you can adjust your needle one more click to the left to stitch a tiny bit closer to the cord. I prefer to use the piping foot for this step also as the foot will grip the cord and you have already established the seam allowance so you can just stitch.

 Always check your seam from the right side and restitch any areas that are questionable. But with these feet you shouldn't have any troubles. 

Above you can see one of the seams from the diaper cover included in the new pattern.

Till next time then, keep stitching.....


Thursday, August 30, 2012

Dental floss - more than one use....

I seldom sew for others but a special friend asked me to make the flower girl dresses for her daughter's wedding this September. So you know what I've been working on all summer! They had to be as perfect as possible and many a night in bed I went over the construction in my mind working out the order of construction.
The bride saw dresses in an old Australian Smocking and Embroidery magazine - sleeveless, smocked from shoulder to waist and a huge full skirt with three layers of netting on top of the skirt. Oh, yes it was all done in silk dupionni. 
When we discussed the fabrics I said yes to the silk dupionni - a fabulous choice but in place of the layers of netting, why not one layer of silk organza - a much classier choice. And I knew the store I was sending mom to would have it to match. 
The children were ages 2 and 5. The gowns were to be full length and both girls were long waisted and likely to grow before the wedding. All big considerations.

To make this long story short I will skip to the gathering of the skirts. 
Both the fabrics were 60" wide, thank goodness, so I didn't have to cut either to join multiple panels. Dupionni ravels terribly and after pulling threads to make sure everything was perfectly on straight grain, with the selvedges removed, all edges had to be overcast to maintain the proper size. I prepared each layer of the skirt - side seams and plackets then layered them to gather to the bodice. The ratio was at least 4 to 1 and it was going to be quite a job to get it all gathered in to fit the bodice. 

Dental floss, 1/4" foot and black latch bobbin case
I needed something very strong and regular thread was out of the question. I considered using a cord and zig zaging over it as I've read about many times before. But I wanted much more control. Then a thought struck me - dental floss! I've used it forever for the tops and bottoms of Christmas balls. It doesn't break no matter how hard you pull on it and better still, I had a package of unwaxed floss in the notions drawer.

So I wound it on a separate bobbin and loaded it into my 'black latch" bobbin case just in case I had to fool around with the tension. Then did a test to see if I could gather it all up as I planned. All worked perfectly.

Test stitching


I set the machine for stitch length of 3 and the upper tension at 4 (normal on this machine is 5). The seam allowance was at 3/8" so three rows of gathering stitching were run: the first at 1/8" from the edge, second at 1/4" and the third at 1/2". When everything was gathered up it would be easy to stitch at 3/8" - it would be right in the middle of the second and third row of gathers!


Fold  in half and pin
Pin - note ratios!
The skirt sections were each divided into four as were the bodice sections, and then into eight. To go further was going to be too tight to get a finger in for manipulation. Fortunately the silk held a finger-pressed fold so that the centre of each section found, pressed and matched up with a pin. 
I learned this technique in tailoring (a different lifetime ago when I was at Ryerson.). We learned to set in a wool suit jacket sleeve with pins only, by breaking down the space this way until you couldn't fit another pin in (no gathering threads!) and stitching very carefully. When we were  finished there wouldn't be a single pucker and a good bath of steam finished the job. Well, this was silk and no amount of steam would touch this dress!

Pulling up gathers
Stitching seam
 Next was to pull up the gathering threads, all three, at the same time. This was easy at first but got harder the further I went. It was essential to work from each end to the center. Almost no adjustment was necessary when completed as the fabric gathered in perfectly. Next step was stitching the waist seam. 

When the stitching was done, the gathering thread in the skirt was removed - with great care. I left the top two rows in place to keep the fullness under control in the seam allowance. 

From the right side; gathering threads in place
Gathering thread removed
Layers separated
The two skirt layers were perfect on the right side of the dress. To make them look fuller, it was easy to separate and fluff them up by the waist. They looked just a full as all those layers of netting!
Hope this has inspired you to make a princess dress for someone special.

So till next time.....


Monday, August 13, 2012

Quick and Easy Baby Socks for Giving

Babies are 'popping up' all over!

New babies call for gifts and if you haven't planned ahead and really want to give something hand made these take only an evening of hand work to create. They are so cute tied to a store-bought gift in place of a bow.

Someone I know is pregnant and although rumor has it she is having a wee baby girl, I really prefer to wait and be sure. So I went shopping for some baby socks - the kind with the ribbed, turn-down cuff. These are perfect for decorating and I can make a little dress later to match. If she does by chance have a boy the flowers can be cut off should they offend daddy.

So, I dug around in my lace stash and found some narrow edging that would do the trick.
 
You will need twice the stretched out length of the cuff edge and just enough for joining the ends. 


With a needle and length of thread, I stretched out the cuff as far as it would go over my index finger and placed the lace face down on the cuff edge. There is no need to pre-gather the lace as when the cuff relaxes the lace will be gathered up.

Whip the edges together - just catching the lace heading and the elastic edge. Keep the stitches spaced no further that an eighth of an inch apart. It was a bit awkward at first but once I got it going, it was much easier to handle. 

It won't take but a few minutes to do this by hand but you could also do it on your sewing machine. Just be sure that you keep the cuff stretched out as far as it will go while you zig zag the lace onto it. 

Whip the ends together to complete the job.

Now if you want to add a bit more, you can use the courses of the knit (the ribs) as pleats and smock your way around. You will want to use waves or very stretchy stitches like Van Dyke. Use your fading marker to draw a couple of lines on the ribs to represent gathering threads if you have trouble visualizing uniform spacing. You can add a few little figures of stacked cables on the side or front. I used little flowers.

Job done - all while I watched the closing ceremonies of the Olympics!

Thursday, July 12, 2012

Tips for a machine Rolled Hem

There are two types of rolled hem that we see made by machine - the rolled hem we use in Heirloom Sewing and a machine rolled hem that we make with a special machine foot.

Three sizes shown here for each for a different weight of fabric.
Some machine brands only offer one size but if you are lucky you will find that your machine has the option of more than one. The largest is for heavy weight fabrics or wider hems. The medium sizes is for fabrics like broadcloth.  And the skinny one on the left is for very light weight fabrics like organdy. The best thing to do is experiment. 

Starting a rolled hem so you have a beautiful, even beginning has always been the toughest part. Here is a little trick that will hopefully give you success.

Cut yourself a piece of waste fabric - it can be interfacing or scrap fabric but should be straight on two sides and about 6 inches long and 1- 2 inches wide.
The fabric you are going to hem should be trimmed of all the little threads left from tearing or raveling. These will just make the job harder.


Butt these edges of the waste fabric to your garment fabric. Now join these with a zigzag stitch or preferably a bridging stitch if you have one on your machine.

Here you can see my waste fabric attached with a bridging stitch. I've used coloured thread to make it easier for you to see what is happening.


Thread up your machine and bring the threads to the surface so you can put them behind the foot. Slide the waste fabric into the foot so it curls within the foot. Begin your stitching a couple of inches from the end of the waste fabric so you can get a good roll going. Stitch at an even medium speed even if you are tempted to rush through - it is not worth it to make an error!

While you are working on the waste fabric, check to be sure your stitching is to the left edge of the roll. This is the time to make any adjustments of this type.

Once this is checked you will want to watch the fabric feeding into the foot. This needs to be constant and the right amount of fabric. Not enough and there will be no roll. Too much and the raw edge will peek out of the roll.

Too little fabric
Too much fabric


Just right!
Note how the fabric just rolls over my index finger.
When the stitching is finished, you can simply cut off the waste fabric, pick out any stray threads from the bridge stitching and voila you have a perfect rolled hem!

From the wrong side

From the right side


If anyone is interested, there is a neat way to finish a sleeve edge using a rolled hem so you don't have raw ends of seams exposed. Just let me know....

In the mean time, keep on stitching.....

Thursday, July 5, 2012

Taking the mystery out of the Bullion Knot...

Bullion Knots are best worked with a lovely long milliners' needle sometimes called a Straw Needle. Both names refer back to the days of hat making when long needles were used and thin needles didn't break or punch big holes into or break straw hats forms .

In this type of needle the eye of the needle is the same size as the shaft allowing wraps to pass off the needle without getting stuck. Many of us smock with embroidery/crewel needles in which the eye is long, wider and flatter than the shaft to make it easier to thread. Unfortunately this wider eye make it very difficult to make any kind of knot that involves wrapping the needle.

The size if the needle will greatly influence the size of the knot. The finer the needle, the finer the knot will be. A #11 milliners' needle is great for a single strand of 'floss'. A #3 will work for a single strand of Pearle cotton. Fortunately milliners' needles come in a good range of sizes so you can match the needle to the fibre with which you are working.

The neatest knots are made with one or two strands of 'floss'. The needle should be slightly larger for two strands. Regardless of how many strands are used, they must not cross over one another on the needle but be wound in a smooth coil. Keep a pencil and piece of paper by your work to record the number of wraps you put on the needle so you can match a second knot to the same size as the one you have just created. If your floss begins to wear or look fuzzy, switch to a fresh piece.

Bullion knots can be created on flat fabric (skip the hoop if you use one) or on pleated fabric for  smocking embellishments. In smocking they are easier to do on the crest of a pleat, running lengthwise but they can be done in any direction. Just be prepared to work through the pleats when traveling from point B to point A. For this reason they are usually left to the end after the smocking has been let out to full size - they have no stretch and will restrict the pleats.
Pleated fabric or flat - come up at Point A, take stitch from B to A


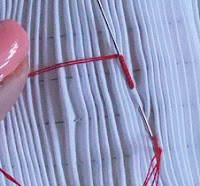
Come to the surface at point A. Take a stitch from point B to point A but do not pass the needle all the way through the fabric. Leave it 'parked' in the fabric to wrap the needle.


With the floss that comes out of fabric at point A, wrap the needle travelling towards the point of the needle. Gently slide the wraps on the needle towards the fabric without disturbing their order. The number of wraps should be as long as the stitch. You can add a couple of extra to be safe. You can take wraps off but you can not add them. Record the number of wraps. 
On pleated fabric right handed
On flat fabric left handed


More wraps than length of stitch...


Hold the wraps, the needle and the fabric in your hand and grasp the needle between the finger and thumb of your other hand to pull the needle through the fabric and the wraps. Do not let go.

Keep pulling until you cannot pull any more. Now you can let go and gently pull the ‘core’ thread (the one that has passed through the wraps) towards point B. If there are too many wraps and the knot bulges too much, you can remove one wrap at a time by passing the needle under the wraps. Gently tighten the ‘core’ thread each time you do this and note the changes on your paper. “Groom” your knot and pass the needle to the back at point B to finish your knot.
Hold to pass needle
Pull until  you can pull no further


Gently pull into place and groom 
Take needle to back at Point B


Come up at Point A, Take stitch from B to A
Wrap as before


To do a second knot, repeat the process by coming up at A, taking a stitch from point B to point A. Usually one starts with one knot or a pair of knots in a dark colour for the centre. The knots around the centre get paler and larger with more curve as the flower builds outward.


Note: To make pairs, when you wrap clockwise the knot will want to curve in one direction. When you go to make its mate, wrap in the opposite direction. 

Note: When you are making a long bullion knot you may wish to anchor it to prevent it slipping out of place. When the knot is completed, come up on the inside with the floss and take a stitch as you would when making a lazy daisy stitch. Stroke the knot to work the stitch into the wraps. It will become invisible and your knot will stay put!

Note: If you are left handed, you work the knot exactly the same way only reverse the hand positions. 

Simple Bud - two bullions
Complex rose made up of several bullions

Tulips in a smocking design - Bullions are horizontal
There are so many configurations of knots and many excellent books out there. This is just to get you started.

So till next time, keep on stitching.....